
Choosing the ankle brace can be a tough decision. It is about more than just a product, it is about feeling stable, recovering from an injury and being confident without pain. With many different sizing guides online it can be hard to find the perfect fit. Some guides are based on shoe size while others are based on how big your ankle’s. This can be confusing. For companies that make ankle braces an incorrect size means a customer will return the product.
At AOFIT we think finding the fit should not be a guessing game. This guide will show you a way to measure your ankle and with the ankle brace size chart you will get the right fit on the first try.
Why should you get an ankle brace that fits correctly?
Many people think an ankle brace is a simple bandage or sleeve. However a high-quality ankle brace that fits correctly is actually a device that helps keep your ankle safe and promotes recovery.
It gives you targeted compression
A comfortable fit gives you steady pressure that can help minimize swelling and irritation. This compression also helps your body know where it is in space. It is like your ankle and brain are talking to each other, which helps you feel steadier on your feet and respond quickly to avoid stumbling.
It gives you support
The main function of an ankle brace is to prevent movements, such as when your ankle rolls inward too much. If the brace is too loose there is a gap between your skin and the support system. Even a small gap can allow your ankle to slip into a position making the brace useless when you need protection.
It helps with biomechanics
When an ankle brace fits properly it works with your body. It supports natural movements, such as pointing and flexing your foot while limiting harmful movements. On the hand a poorly fitted ankle brace can cause problems in two ways:
If the ankle brace is too loose it may shift or slip down during activity. Nor does this fail to provide adequate support but it can also lead to painful chafing and give you a false sense of protection, which may increase the likelihood of re-injury.
If the ankle brace is too tight around your ankle it can be harmful. It may cut off blood circulation, compress nerves leading to tingling or numbness and cause skin problems like irritation or pressure sores. The goal is to provide support not to cut off circulation or comfort.
How to Measure the Ankle for a Proper Fit?
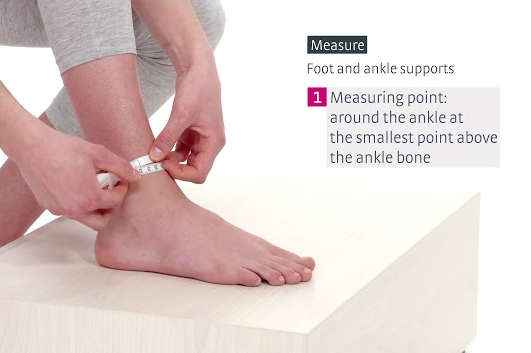
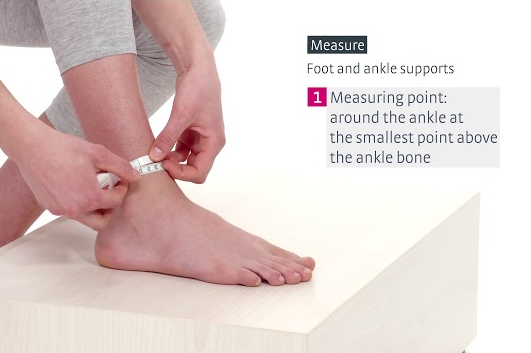
To ensure an accurate fit take a two-minute measurement of your ankles actual circumference.
First get your tools ready
You will need a flexible measuring tape plus the athletic socks you normally wear during activity.
Then follow these steps to measure your ankle
- Get ready. Take your measuring tape and put on the thin sock you will wear with the ankle brace.
- Sit in a chair with your foot flat on the floor so your ankle forms a 90-degree angle.
- Wrap the tape.(Here’s something worth knowing first: lace-up and stirrup braces measure a diagonal wrap from the heel around the ankle (called the heel-to-ankle oblique). Sleeve-style braces measure straight around the narrowest point of the ankle. The numbers look similar, but they are not interchangeable. )
- Pull the tape so it sits snugly against your skin without digging in. You should be able to slip one fingertip between the tape and your ankle.
- Measure three times. Repeat the measurement three times for consistency. If the numbers differ slightly use the average as your size.
Two tips for accurate measuring
- Always wear your usual athletic sock. The thickness of your sock can affect the measurement.
- Stand and put weight on your foot. Measuring while seated can be misleading.
Last match your size with the ankle brace size chart
Your ankle circumference will help you locate the right size on the brand’s specific sizing chart.
General Ankle Brace Size Chart (Lace-Up & Stabilizer Styles)
| Size | Ankle Circumference (in) | Ankle Circumference (cm) |
| XS | 9–11″ | 23–28 cm |
| S | 11–12″ | 28–30.5 cm |
| M | 12–13″ | 30.5–33 cm |
| L | 13–14″ | 33–36 cm |
| XL | 14–15″ | 36–38 cm |
| XXL | 15–16″ | 38–41 cm |
These ranges match industry standards across major brands — including DonJoy, ManaMed, and Med Spec ASO. Use them as a reliable starting point, even for brands not listed here.
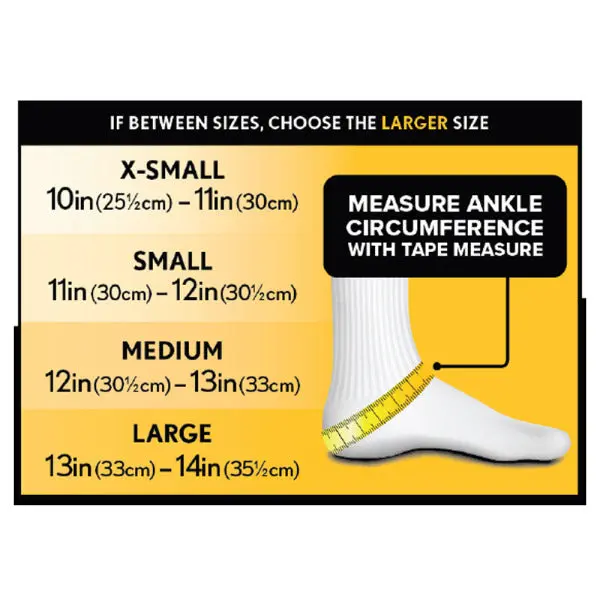
Sleeve-Style Ankle Brace Size Chart
Compression sleeves use a much tighter size scale. Sizing a sleeve instead of a structured brace? Use this chart:
| Size | Ankle Circumference (in) | Ankle Circumference (cm) |
| XS | 6–7″ | 15–18 cm |
| S | 7–8″ | 18–20 cm |
| M | 8–9″ | 20–23 cm |
| L | 9–10″ | 23–25 cm |
| XL | 10–12″ | 25–30 cm |
What if your measurements fall between sizes?
Your measurement lands on 12″ or 13″ exactly? That’s useful — not a problem. Here’s how to decide:
- Sports and high-movement activity → Size down. A snugger fit gives you better support during lateral cuts and quick direction changes. Just don’t wear it for more than 3–4 continuous hours at that tension.
- All-day wear, daily walking, or overnight use → Size up. You get better circulation, less compression fatigue, and a fit that stays comfortable through hour eight.
- Visible swelling or post-surgery → Size up, no debate. Swelling builds through the day. A brace that fits fine at 8 a.m. can feel like a tourniquet by afternoon.
The default rule — the one every major brand agrees on — is size up when in doubt. A roomier fit still supports well. A brace that’s too tight can slow healing. AOFIT recommends: Always follow the ankle brace manufacturer‘ sizing instructions.
Ankle Brace Sizing by Shoe Size (Men’s & Women’s Charts)
Shoe size is the shortcut most people reach for first — and for many brace styles, it works just fine. The trick is knowing when to trust it and when to grab the measuring tape instead.
Here’s how it breaks down:
- Sleeve-style and lightweight compression braces are built around shoe size. The materials stretch enough to handle small fit differences.
- Structured lace-up and stirrup braces — the kind with hard support stays and cross-straps — need your ankle circumference too. A wrong size in those styles doesn’t just feel off. It can slip, pinch, or fail to stabilize.
Use shoe size as your primary guide? This chart covers the full range:
Men’s & Women’s Ankle Brace Size Chart by Shoe Size
| Size | US Men’s | US Women’s | EU | UK |
| XS | 4–5.5 | 5.5–7 | 35–37 | 3–4.5 |
| S | 6–7.5 | 7.5–9 | 38–40 | 5–6.5 |
| M | 8–9.5 | 9.5–11 | 41–43 | 7–8.5 |
| L | 10–11.5 | 11.5–13 | 44–45 | 9–10.5 |
| XL | 12–13.5 | 13.5–15 | 46–47 | 11–12.5 |
One conversion rule worth keeping: US women’s sizes run about 1 to 1.5 sizes larger than men’s. So a chart that lists men’s sizes only? Subtract 1.5 from your women’s size to find the match. A US women’s 9.5 becomes close to a men’s 8 — that puts you in Medium.
Shoe Size Alone Isn’t Always Enough
Swollen ankle? Wider-than-average foot for your shoe size? Cross-check with your ankle circumference before you decide. Take someone in men’s US 9 with a 25 cm ankle circumference — they belong in a Large, not the Medium that shoe size points to.
Wide-foot note: You buy wide-width shoes (2E or 4E)? Go up one full size from what the shoe chart says. This matters most for zip-closure and full-wrap brace styles. For high-stretch sleeves, sizing up is optional — but your shoe size falls at the top of a range, don’t hesitate to go up.
Different Brace Types Have Different Sizing Rules
Most sizing guides skip right past this: the number on the tag means something different depending on which type of ankle braces you’re holding.
| Brace Type | Primary Sizing Variable | Size Tolerance |
| Lace-up | Shoe size + lace adjustment | Moderate — ±2–3 cm ankle circumference |
| Stirrup (hard shell) | Ankle height + shoe size | Narrow — 2–3 shoe sizes max |
| Compression sleeve | Ankle circumference | Tight — 2 cm range per size |
How tight should an ankle brace be?
It needs to feel stable and supportive, offering noticeable compression without causing pain, tingling, or changes in skin color. You should be able to move through your sport or daily routine without the brace slipping or causing excessive friction. A good way to check is to see whether you can slip just one finger between the brace and your skin.
Once you receive your brace, follow these guidelines to ensure the fit is correct:
Too Tight: You feel tingling, numbness, or a pulsing sensation. Your skin may look discolored or feel cool to the touch.
Just Right: It feels comfortably tight—similar to a firm handshake around your joint. The pressure is even, with no sharp pain or tender spots. You should enjoy full movement while feeling well-supported.
Too Loose: The brace moves or slides around when you’re active. You can easily insert more than one finger between the brace and your skin, and you won’t experience a solid sense of support.
How can brands improve their ankle brace size chart information?
If brands want fewer returns, they need to get serious about their ankle brace size charts—and that means working closely with their custom brace manufacturer.
Shift from Shoe Size to Anatomical Measurements
The old trick of just matching by shoe size doesn’t cut it. Ankles are all kinds of shapes and sizes, not to mention swelling or wider calves. Start by making ankle circumference the main focus. Have people measure around the narrowest part just above their ankle bone or the widest part over the heel—don’t just rely on shoe size. And don’t stop there. The size chart should show ankle circumference (in inches and centimeters), heel width, and shoe size (US/EU/UK). Use both centimeters and inches so folks everywhere get the picture.
Implement Visual and Video Guidance
Plain text charts are way too easy to mess up. Diagram it out—mark exactly where to place the measuring tape, like running it diagonally over the base of the heel and across the ankle bone. Add some quick videos: here’s how to measure, here’s how to put the brace on. Pictures make a difference too—show what fits too tightly and what fits just right. A photo comparing a brace squeezing the skin vs. one that’s “snug like a firm handshake” tells the whole story.
Clear Instructions for Edge Cases
Now, think about edge cases. People’s ankles swell up, so say when to measure (like, at the end of the day if they swell). If someone’s stuck between two sizes, spell it out: “Go smaller for sports, bigger for all-day comfort.” Suggest an easy test like the “two-finger rule”—you should be able to slip two fingers between the brace and your skin so it’s not cutting off circulation.
Define “Universal” Sizes Clearly
For those “one-size-fits-most” braces, don’t just say it—show how those adjustable straps actually make it work, so people know what to expect. In the end, the more info and visuals you give, the fewer returns you’ll see, and the happier your customers will be.
FAQ on size chart for ankle braces
When should I measure my ankle when it is swollen?
It is best to measure your ankle when the swelling is at its lowest right after waking up.
What if my right ankle and my left ankle are different sizes?
That is actually very common especially if one ankle has been hurt before or tends to get swollen. You should measure each ankle separately. Choose the ankle brace size that matches the ankle you plan to wear it on.
Should I wear the ankle brace over a sock or directly on my skin?
We always suggest wearing your ankle brace over a dry athletic sock. This makes it more comfortable, helps avoid skin irritation and keeps moisture under control while you are active.
Conclusion
You now possess the specialized expertise to accurately determine and choose the correct brace size across various brands. Proper sizing is the most essential first step toward improved support, quicker recovery, and a more active lifestyle.
For brands, once the fit requirements are clearly understood, the next priority is to ensure that sizing curves and samples are correctly developed on the production side. If you’re planning to launch a private-label product line, contact AOFIT to explore our custom ankle manufacturing solutions, designed to align more precisely with the needs of your target users.