

Your Medial Collateral Ligament (MCL) runs along the inside of your knee. It links your thighbone to your shinbone. Different from the ACL, which can tear all once, MCL injuries usually happen slowly. You can hurt your MCL by taking a step while playing basketball or getting hit from the side while playing soccer. You can even hurt your Medial Collateral Ligament by tripping on a curb.
The good news is that a good knee brace can really help your Medial Collateral Ligament injury heal.
In this article we will tell you how to pick the knee brace for your needs. You can get a sleeve, a hinged knee brace or a wrap-around knee brace. We will also show you how to put on a knee brace the right way. If you do these things correctly your knee will get the support it needs to heal not just feel a little better for a short time.
What Do Knee Braces Actually Do for MCL Injuries?
A knee brace for an MCL injury gives outside support, keeping your knee from moving side-to-side while still letting you walk naturally. Studies show that a well-chosen brace can cut down the stress on your injured MCL by up to 40%. That’s a pretty big deal when you’re trying to recover.
Braces don’t just help you feel safe—they protect your knee from the kind of inward buckling (called valgus stress) that probably caused the injury in the first place. Whether you’re walking, pivoting, or trying to mow the lawn, the brace stops those dangerous inward movements that could set your recovery back. This isn’t just about comfort—it’s about real protection when your knee is vulnerable.
Expert Opinion:
“In my clinical experience treating MCL injuries, one of the most common mistakes I see patients make is assuming that any knee brace will do the job. The biomechanics here are nuanced: the MCL is the primary restraint against valgus stress, and if your brace isn’t specifically designed to limit that inward collapse, you’re essentially wearing a placebo. For Grade 2 and Grade 3 tears especially, I always emphasize to my patients that polycentric hinges aren’t a luxury—they’re a functional necessity. They replicate the natural rolling and gliding motion of the knee joint, which means the brace works with your anatomy rather than fighting it. My practical advice: before you buy any brace, confirm it offers bilateral support and adjustable hinge stops. A brace that controls your range of motion in the early weeks, then progressively opens up as your ligament heals, is what actually drives recovery outcomes—not just pain relief.“————Dr. James R. Andrews, Board-Certified Orthopedic Surgeon & Sports Medicine Specialist, Fellow of the American Orthopaedic Society for Sports Medicine (AOSSM)
Picking a Knee Brace for MCL Injuries: What Type Should You Use?
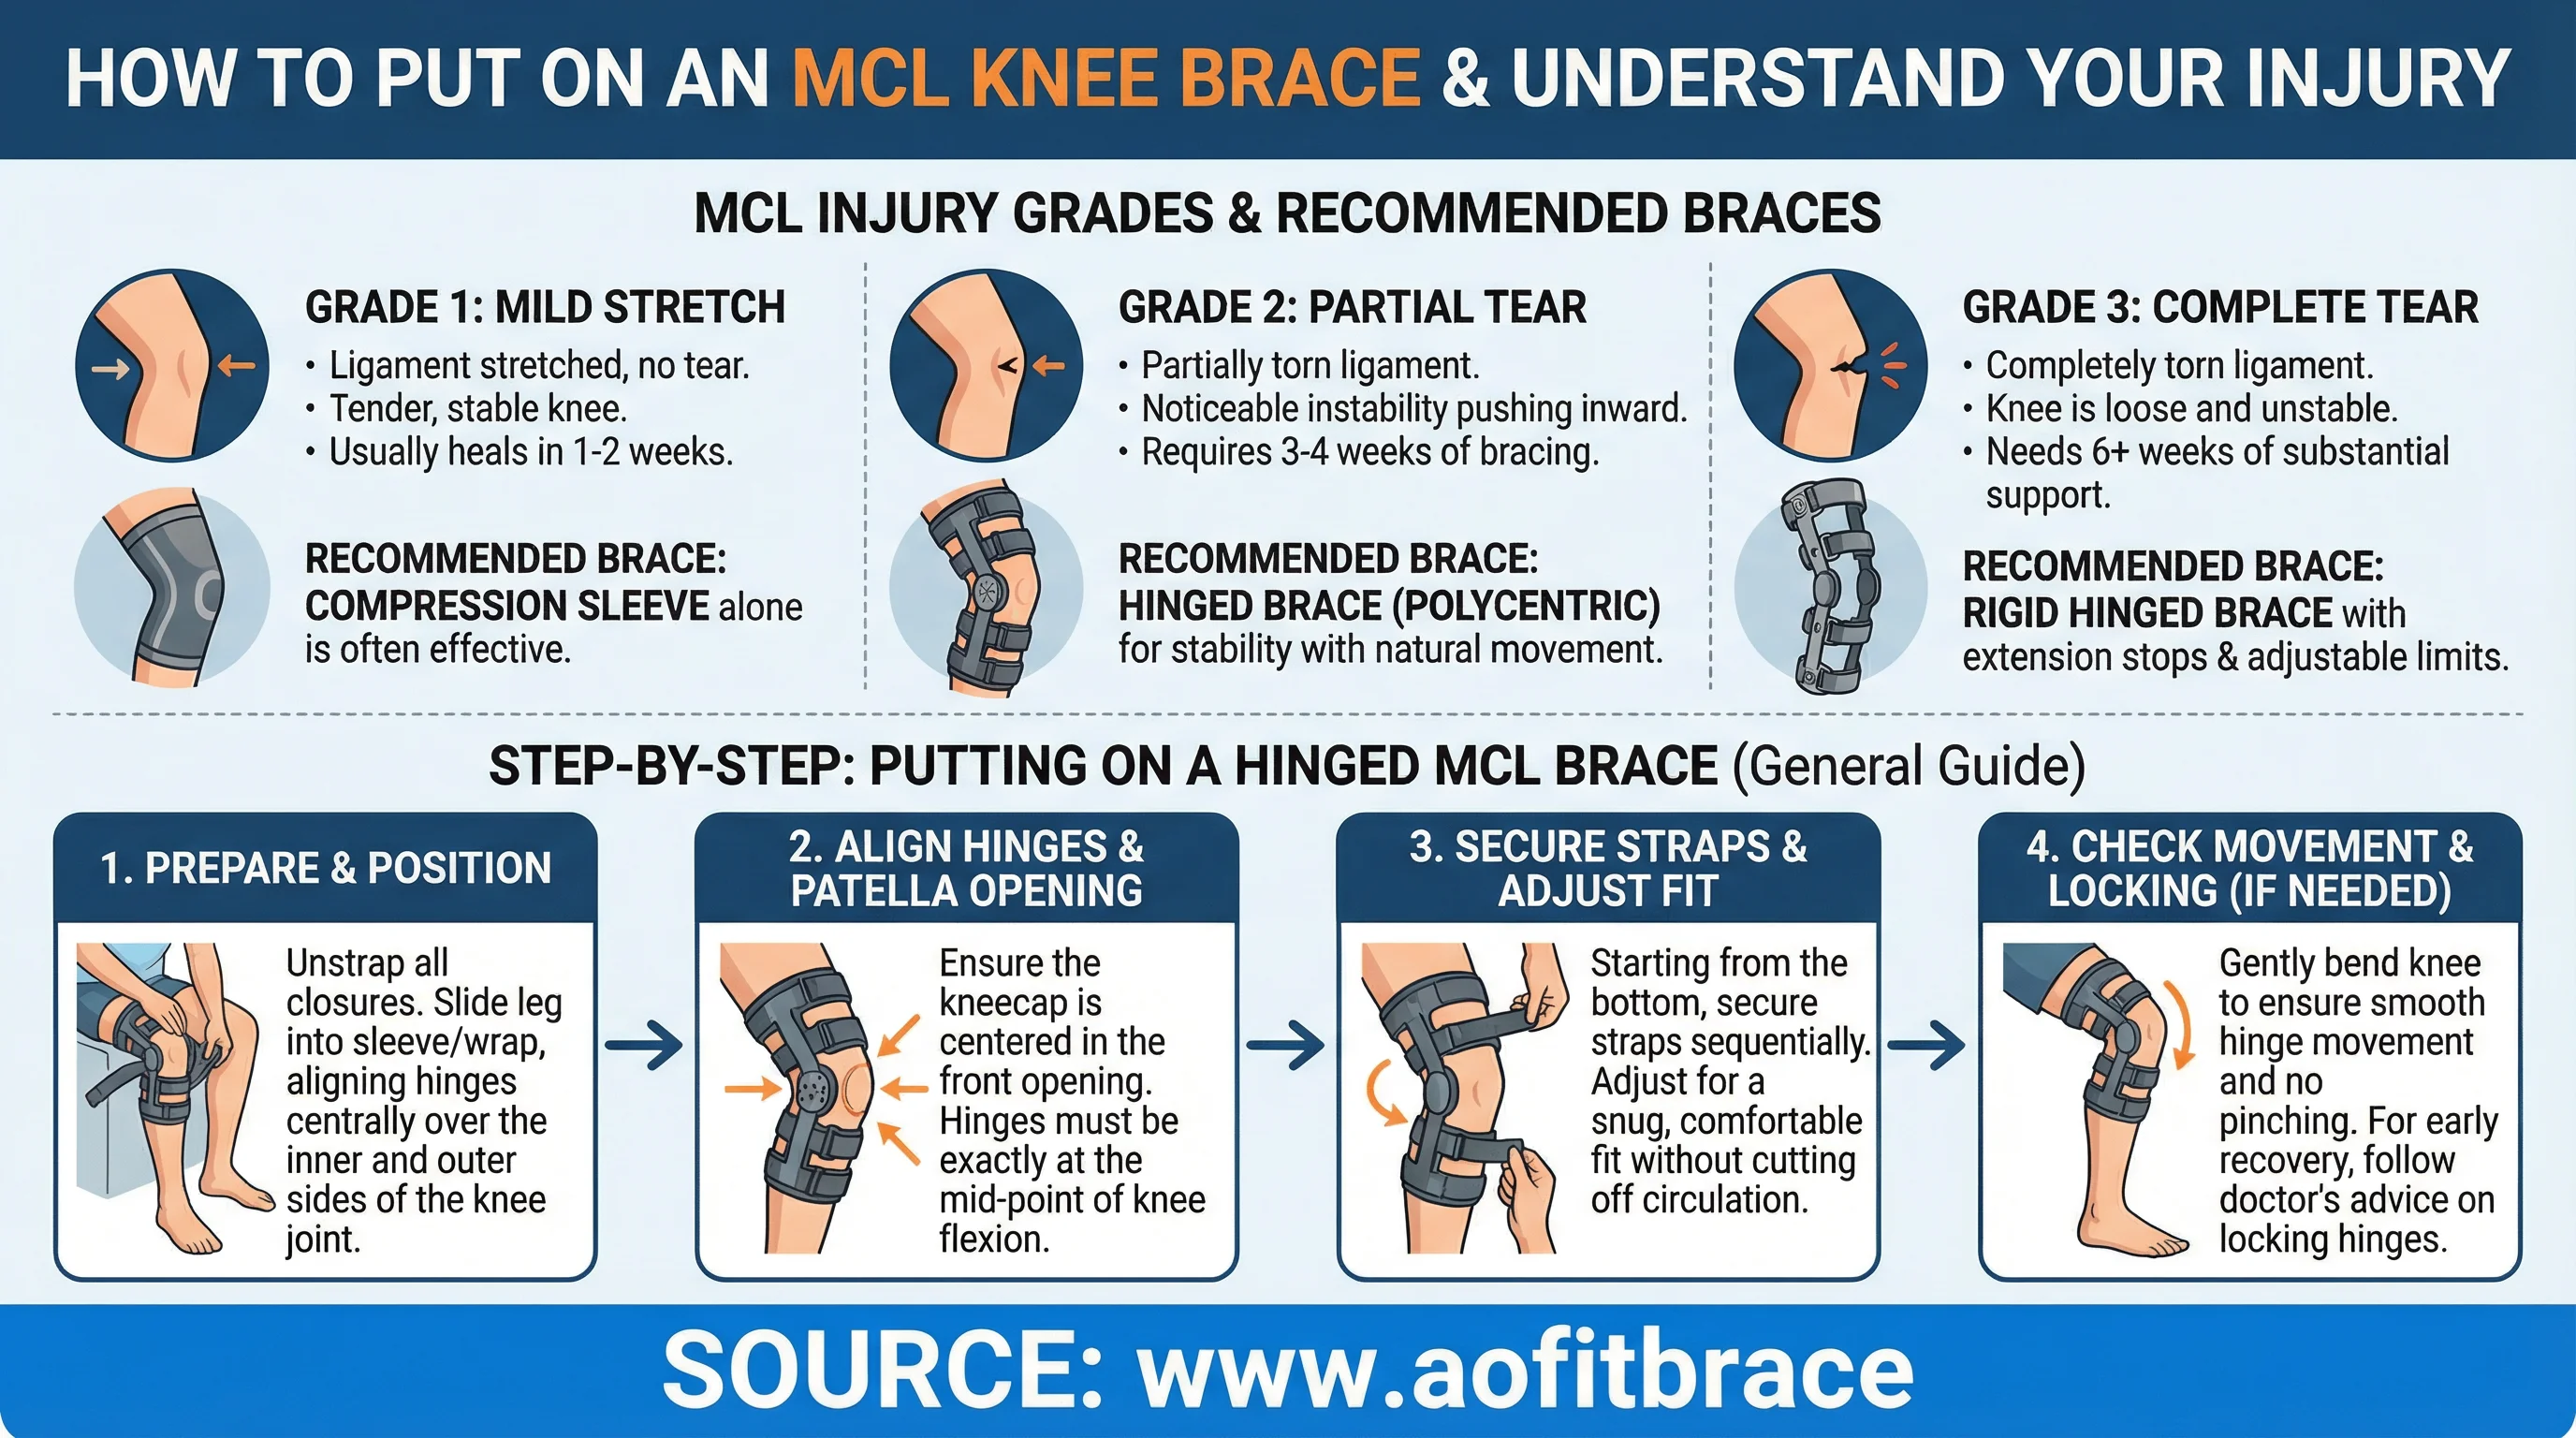
There are three grades of MCL injury. The type of brace (or no brace) you’ll need depends on which one you have.
Mild Stretch (Grade 1):
This is when the ligament’s been stretched but not torn. You’ll likely have some swelling and tenderness, but your knee still feels stable. Most of these injuries get better in one to two weeks with rest, ice, and some gentle movement. Bracing isn’t usually required, but a compression sleeve can be helpful if you’re active or your knee gets sore during sideways movements in sports or hiking.
Partial Tear (Grade 2):
Now the ligament is actually torn—just not all the way through. Your knee might feel wobbly when you put pressure on it from the inside. This is when a real MCL brace becomes important. Consistent bracing for three or four weeks helps stabilize the knee while giving it room to move. Grade 2 injuries do best with braces that use polycentric hinges—these allow your knee to bend naturally but block those side movements that can do more damage.
Complete Tear (Grade 3):
Here, the ligament is fully torn apart. Your knee feels loose, unstable, and unpredictable. You’ll need serious support from a rigid, hinged brace—usually for at least six weeks—to control exactly how much your knee can bend or straighten. You want maximum control here, with hinges that can lock or limit your movement.
How to Put on Different Types of MCL Tear Braces
Don’t rush this. Putting a brace on wrong means it won’t work as well, so slow down and get it right. Here’s how it’s done:
Hinged Braces:
If you need big-time support, get a hinged brace. These have sturdy metal or carbon reinforcements on both sides and hinges you can adjust. The brace usually covers you from mid-thigh to mid-calf and can be locked to limit movement early on, then opened up gradually as you heal. In the early stages of healing, the hinges may be locked at 0–30 degrees. As recovery progresses, the range of motion can be gradually increased until full movement is restored.
How to put on a knee brace with hinges?
1. Get the hinge lined up with the center of your kneecap—this is the knee’s natural pivot point.
2. Secure the top strap first (around your thigh). It should be snug, but not cutting off circulation.
3. Fasten the lower strap (just below the knee, around your calf) with even pressure, so the brace supports both above and below your knee.
4. Adjust the hinge before you start moving. If your doctor told you to limit motion, set the stops to match your current range. As you get stronger, gradually open it up.
Wraparound Braces:
These are made of stretchy material with adjustable straps—easy to put on and take off. They’re great if your swelling goes up and down or you’re doing physical therapy. While not as rigid as hinged braces, they’re perfect for moderate injuries or the later stages of recovery. A quick tip: Don’t just support the injured (medial) side. Go for a brace offering support on both sides, so you’re not accidentally overstressing the healthy ligaments.
How to put on a wraparound brace?
1. Open the brace fully, with the wider side at the top.
2. Slide your leg in so the back opening is directly behind your knee.
3. Bring both sides of the brace around your leg and secure each strap at the front with Velcro.
4. (If there are hinges, make sure they’re lined up so they move the way your knee does.)
5. Fasten the top strap first, then the bottom one. Pull each through any rings, double back, and make the straps snug—but not so tight that your foot tingles or your skin gets red.
Compression Sleeves:
These are for mild MCL injuries or as you phase out of more restrictive braces. They’re slipped on like a sock. Compression sleeves don’t provide heavy support but do enhance your body’s awareness of joint movement—which is crucial when you start being active again.
How to wear a knee sleeve?
1. Make sure your sleeve is clean and dry with no lotions or oils on your knee, or it’ll be tough to get on.
2. Line up the seam so it faces out and the opening is up.
3. Slide your foot through and pull the sleeve up, keeping your knee in the center.
4. Adjust so the sleeve is snug but not bunched up or twisted. The top of the sleeve should be just above your kneecap, the bottom just below.
5. Before getting active, do a few squats or lunges. Make sure you can move comfortably and the sleeve isn’t cutting off circulation.
Tips for Wearing a Knee Brace
- Pick the right brace for your injury. If you try to use a light sleeve on a severe tear, it just won’t cut it.
- Wear clothes that make life easy—shorts and skirts work best. If you need pants, choose those with wide legs. Don’t try squeezing your brace over skinny jeans or leggings. If you absolutely have to wear them, put the brace underneath.
- Prioritize comfort. You might wear the brace for weeks, so moisture-wicking liners, good padding, and adjustable straps make a big difference, especially if your swelling changes during the day or you’re active.
- Get a good fit. Braces that are too tight or loose won’t help and might even hurt. Always check the sizing chart from the knee brace manufacturer and measure before you buy.
Key Features of MCL Braces at a Glance
| Feature | Hinged Braces | Wraparound Braces | Compression Sleeves |
| Stability Level | Provides maximum control over knee movement | Offers moderate support while allowing flexibility | Delivers mild compression and enhances proprioception |
| Best for Injury Grade | Ideal for Grade 2–3 MCL tears | Great for grade 2 injuries and late recovery of grade 3 | Best for Grade 1 strains and injury prevention |
| Range of Motion Control | Adjustable limits for both flexion and extension | Allows natural movement with added lateral support | Permits a full range of motion |
| Typical Recovery Duration | Used progressively over 4–8 weeks | Worn consistently for 3–6 weeks | Used for 1–3 weeks or as ongoing prevention |
| Activity Compatibility | Suitable for daily activities and controlled sports | Works with most activities; easy to put on and remove | Compatible with all activities due to minimal bulk |
Conclustion
Bracing for MCL injuries isn’t one-size-fits-all. Mild injuries may only need a sleeve. For more serious tears, wraparound or hinged braces make all the difference. It really comes down to matching the brace to the injury—and wearing it the right way. With a little patience and the right support, most people bounce back and get back to their regular routines with no lingering problems.
If you’re ready to get started, check out AOFIT’s line of knee braces for MCL injuries. As a sports brace factory and orthopedic brace manufacturer, we offer a complete range of braces and supports for the major injury-prone areas of the body. Now, contact our professionals for more advice.